There are many options when considering how to create the kitchen area in your van. A common approach is finding a pre-made cabinet and installing a countertop, which is perfectly fine. However, in an effort to maximize our space and ensure our drawers were sized to fit everything we needed, we decided to build from scratch.
Clutch Resources:
Sprinter Van Diaries - Feeding station build
Tools / Hardware:
1x3 select pine
1x2 select pine
2' x 4' sheets of plywood
Corrugated steel sheets (thin pattern vs wide) - buy from amazon
Poplar lumber (multiple lengths and widths for drawer boxes)
Locally sourced black walnut board (for countertop)
16" drawer slides - buy from amazon
Magnetic drawer catches - buy from amazon
Mechanical drawer catches - buy from amazon
Drawer hardware - buy from amazon
Hand pump faucet - buy from amazon
Under mount sink - buy from amazon
Kreg pocket screw kit - buy from amazon
Jig saw - buy from amazon
Clear satin spar-urethane - buy from amazon
Silicone - buy from amazon
The Install:
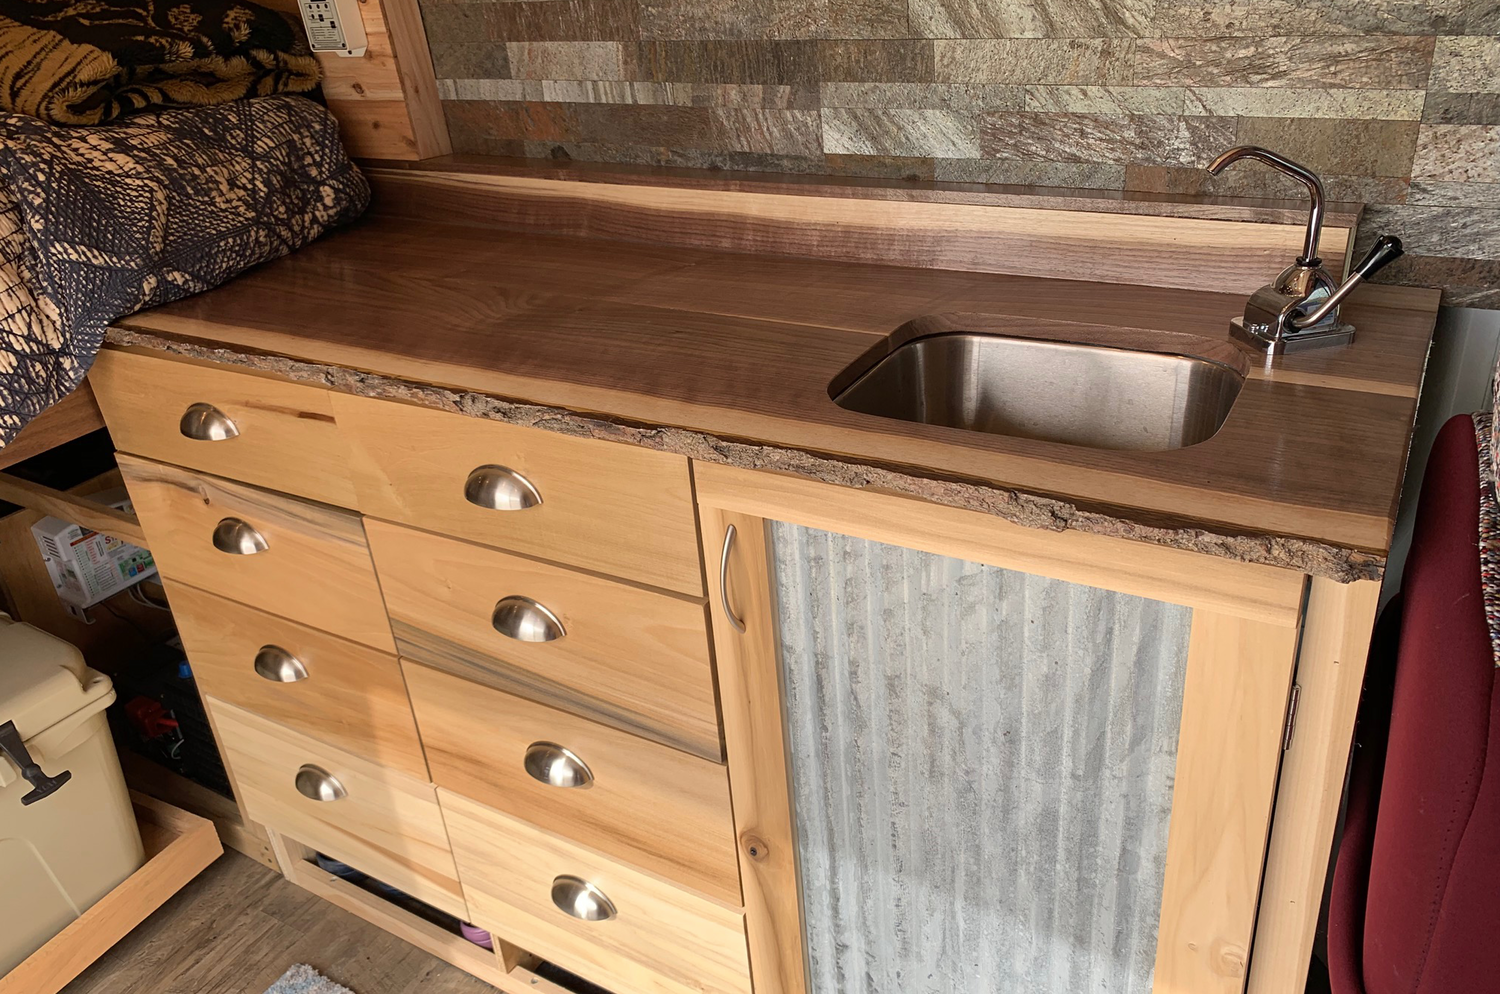
We began this part of the build like so many others, measure, measure again, measure a third time, etc. We wanted to maximize the space of the cabinet / countertop while not consuming all of the living space of the van. We landed on cabinet dimensions of 36" high x 18" deep x 55" long. Key tip: When sizing your cabinet, make sure your drivers seat is in the furthest back and leaned position you require, so that your cabinet does not force you to sit at a 90 degree angle while driving. We started the cabinet by building a basic frame using 1x3 pine to create the left and right sides and 1x2 pine to connect them on the front and back.

Once we had the basic frame together, we spent quite a bit of time trying to level the unit both front to back and left to right. As you know, the van is not level and wood is never straight, so needless to say we used a bunch of shims and did our best. We ended up using a blend of what the level was telling us and what looked level to end up in a happy place. We then secured the cabinet frame to the van from both the 1x2's at the bottom and back of the frame as well as the left side into the bed frame.
Our design for this cabinet included 2 sections of drawers and an open section for clean / grey water; therefore, requiring 2 section dividers. Our next step was to build and install the section dividers, which are also the supports for the drawer slides. These were built exactly the same as the left and right sides, out of the 1x3 pine and plywood. We missed getting a picture before the drawers were in, but the picture below shows these dividers.

With the frame complete, it was now time to build and install the drawer boxes. We had already planned the layout and sizes of the drawers as well as the spacing between. This is a critical step to ensure what you want fits where you want it! The drawer boxes were constructed out of poplar, using Kreg pocket screws. The bottom of each side of the drawer was routed so that the bottom would sit flush. The bottom of the drawers were secured with glue and nailed. The drawer boxes are all 15.5" wide by 17.25" deep and from top to bottom in height are 3", 5.5", 5.5" and 7.5".

Now that the drawer boxes were all built, it was time to install the drawer slides. We had originally bought 18" drawer sides, thinking that would work with our 18" deep cabinet, but they were slightly too long. We ended up using 16" slides which still provide ample drawer extension. We installed the slides on the bottoms of the sides of each drawer box. The next step was to install the slides on the cabinet. To do this, we started with the top and measured the size of the top drawer box (3.5") plus 1" ( for clearance from the cabinet) therefore placing our slide 4.5" below the front brace of the cabinet using a screws and a level. The remaining slides are a bit different. For the balance of the drawer slides, we measured the size of the drawer box + 1" for that drawer box facing + 1" for the above drawer box facing + 0.5" for space between the drawer faces.

With the slides in place and the drawers complete, we measured, cut, stained and installed the drawer faces. The faces were also made from popular and treated with 2 coats of a clear coat with a light sand in between. You may have noticed 3 pictures back that the drawers did not look level and this is correct. In order to make the slide install easier we used the reading from the level as the guide even though it appeared off to our eye. We corrected for this when installing the faces and ensured that the top of the faces looked level to the eye. We intentionally left about 4" of open space under the drawers as an open storage space (we currently use it for shoes and other items).

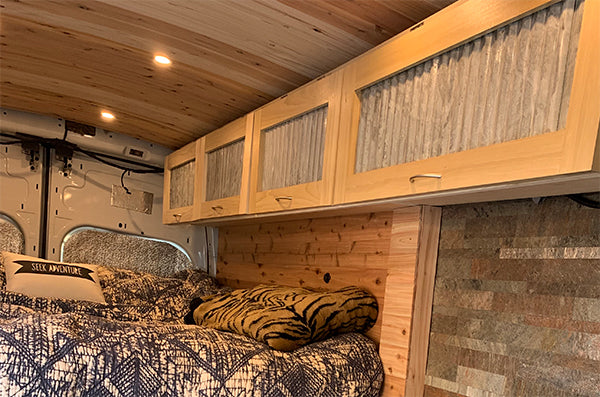
The next step was to build the door for the right side of the cabinet. We built the door using 1x2 and 1x3 poplar backed with plywood. We wanted to tie in the corrugated steel used in the upper cabinets (Upper Cabinet blog post to come), so we inlayed the tin vertically and used glue and pin nails to keep it in place. We did not like the shiny look of the tin, so we gave it a distressed look using white vinegar (see how-to blog post) Once the door was complete, we used basic hinges to attach it to the cabinet.

With the drawers and door complete, we now needed a way to keep everything closed while we were driving. We did a few test drives to see if this was necessary and it most certainly was! Based on the design of the cabinet and drawers, we needed to use 2 different options. Most of the drawers were able to use the mechanical closures (photo 1 below) while a few others needed to use magnetic closers (photo 2 below).


So at this point, all the cabinet needed was a countertop! We wanted something really special for the counter top and were able to find a beautiful piece of locally sourced black walnut with a live edge and roughly 1.5" thick. After purchasing the wood, we brought it home and laid it horizontally on a few 2x4's inside for 2 weeks to dry out.

Unfortunately, we did not take any pictures during the refinement of this wood. The process was pretty simple though...once the wood was cut to size, we cut out the holes for the sink and faucet using the templates that came with each Once everything was cut and smooth, it was time to stain. We followed a pretty standard method: sand, stain, let dry and repeat. We applied 6 coats of a clear satin spar-urethane. Because the spar-urethane needed several hours between coats to dry, the process took about 4 days. *Note: when sanding in between stain coats, sand very lightly as to barely notice you went over it. We also planed down and stained a few thin pieces of the black walnut to face 2 2x4's and create a 4" shelf/backsplash to match the countertop. For this, we only applied 4 coats of stain using the same sand, stain, dry process.

We installed the sink using the included brackets as well as added silicon to the lip where the sink meets the wood. This was done with the counter top outside of the van. The next step was to put the backsplash into place and secure with glue and screws. We then installed the counter top which sits flush against the backsplash and secured that to the cabinet with screws from below. We also added a bead of silicon to the gap where the countertop meets the backsplash. With all this complete, we installed the faucet and connected both our clean and grey water tanks, added a bit of drawer hardware and presto...a shiny new kitchen cabinet and countertop!


2 comments
Amanda - Seek Dry Goods
Aaron- very glad to hear this was helpful for you! Good luck with OGAVans!
Aaron- very glad to hear this was helpful for you! Good luck with OGAVans!
Aaron Fensterheim
Thanks for sharing this Installation process.
It really helps me for Build Cabinets in Van. https://www.ogavans.com/
Thanks for sharing this Installation process.
It really helps me for Build Cabinets in Van. https://www.ogavans.com/